
Rotor Blade Preventive Maintenance
Dana Kerrick — Contributing Author
It’s not unusual to receive rotor blades for repair after they’ve sustained damage from wire strikes, tree strikes and hangar strikes, or sometimes human strikes. The nature of the mission of the helicopter makes it necessary to “get close” to the job, and often increases the chance to experience these types of damage. This damage is never intentional and repairing it has always been the major part of our business.
All too often, we receive blades that have been damaged by corrosion, erosion or ground handling. Almost all of this damage is preventable if the operator knows what to inspect for and is willing to apply some readily-available preventive maintenance techniques to the blades. This article shares some tips that can help keep your blades in the air longer and lower your direct operating costs over the years.
Corrosion
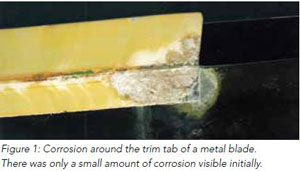
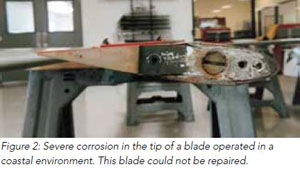
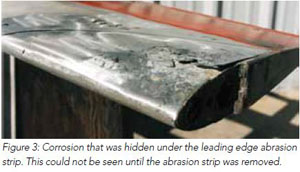
Let’s discuss corrosion first. We’ve all seen it in one form or another. It can show up as surface corrosion which looks innocent enough and progresses to intergranular corrosion where these metal termites can completely destroy a blade. In order to slow or prevent corrosion, it is important to understand the corrosion process. Corrosion is a natural tendency for metals to return to their original salts and oxides. The speed at which the corrosion progresses depends upon several factors like the operating environment, the choice of alloys used in manufacture, the paint and primer systems used, and the preventive maintenance measures taken by the operator to slow the corrosion process. Shown on page 12 are some examples of corrosion in rotor blades.
Corrosion Prevention
Let’s take a look at some of the tools an operator can use to prevent, stop or at least slow the effects of corrosion. The type of alloys used in manufacture, coupled with the paint and primers used, are the first line of defense against corrosion. When the paint and primers have been worn by erosion, the exposed metal is vulnerable and needs some attention in the form of preventive maintenance.
A good fresh water wash with a mild soap is still the best and least expensive way I’ve found, followed by a coating of your favorite approved corrosion prevention compound. There are many good anti-corrosion products available such as Corrosion-X, ACF-50 and LPS products that seem to protect metals well. These products work by displacing water, which forms the electrolyte that sustains the corrosion process. Remove the electrolyte and the corrosion process is stopped — period! When operating in coastal or tropical climates, or areas that have high amounts of chlorides in the air from smokestacks, it’s usually necessary to take extreme measures to protect blades and other components of the helicopter.
Sometimes a daily wash followed by a good application of anti-corrosion products will do the trick. I once talked to the pilot/mechanic on an ocean research vessel that operated in every ocean and had to weather storms with waves that sometimes washed completely over the Schweizer 300 they were using at the time. His plan was to wash all metal parts completely and apply corrosion preventing compounds to all metal parts after each flight. When the helicopter was traded up for a bigger model, the metal parts were inspected and looked like new under the preservative.
Care of Non-metallic Blades
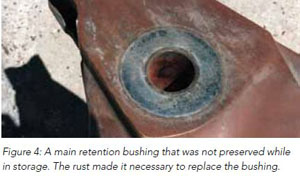
Non-metallic blades do not corrode, but some blades use metal parts for fasteners or weights. The latter, if exposed, will corrode and cause internal swelling within the blade structure. When working with non-metallic blades, most manufacturers recommend only a good wash of the blade with a mild soap and warn against the application of wax or oily substances to the blade. Most of these substances can migrate into the blade fibers and prevent paint from sticking and make future repairs difficult. For long-term storage of any blades that are not going to be used for a while, make sure they are washed thoroughly and the metal bushings have a light coating of grease. Apply your best corrosion prevention compound to exposed metal parts and place the blades in the proper blade container. If the blade is to be stored on a wall rack, place a sheet of packing paper on top of the blade. The paper serves to keep bird droppings off the blade, as they can be very corrosive.
Erosion
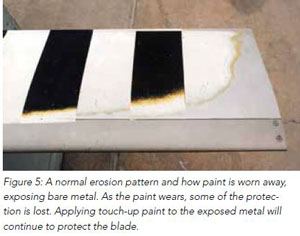
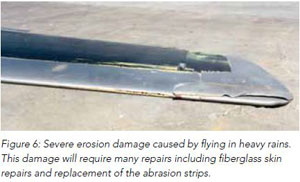
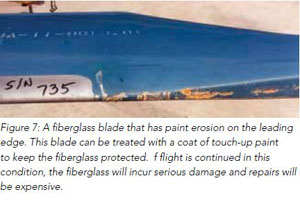
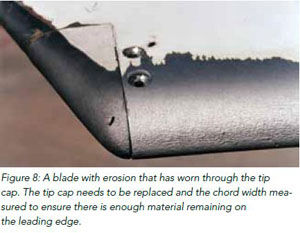
Erosion is caused by the impact of small particles of sand, dirt, volcanic ash, or even water to the blade’s leading edge. Volcanic ash causes the most damage to the leading edge, with water from a heavy rain following as a close second. (Think sand blasting and water jet cutting.) The best defense a blade has is the manufacturer-installed erosion protection. This can be in the form of urethane or epoxy paint, hard anodizing, or installing erosion strips made of metal or polyurethane tapes. In heavy erosion areas, some operators install additional polyurethane tapes over the existing leading edge protection. As the paint wears and exposes metal or fiberglass, a local application of touch-up paint (usually lacquer) will continue to protect the blade. Touching up with lacquer protects the exposed metal and feathers well without chipping. If too much paint is applied and balance is affected during the touch-up, it wipes off easily with Naptha and can be redone without sanding. This touch-up can be done as often as needed. Regardless of the design of the blade, it is important to replace the worn erosion protection material before the more vulnerable parts of the blade become exposed and damaged.
Erosion Types
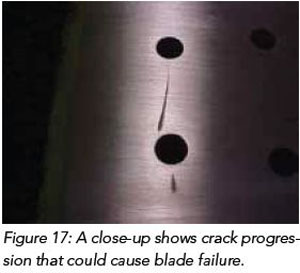
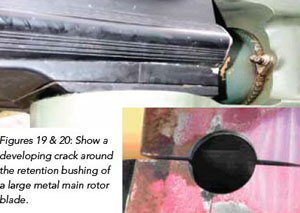
Inspection (Cracks)
If a defect is found early it will often be repairable. If left alone, some defects, especially cracks, could cause structural damage or failure of the blade. When you do your inspection, pay particular attention to any cracks discovered, regardless of how small they appear. A good inspection routine for rotor blades will include running your hand along the entire trailing edge of the blade to feel for cracks or other defects. If you find a defect, mark that area for a full inspection that could include dye penetrant, eddy current or X-ray inspection. A small dent in the trailing edge of a metal blade can quickly grow chordwise into a major crack that could fail the blade. Fiberglass or carbon are much more forgiving because the cross fibers resist crack propagation, resulting in a slow, non-catastrophic failure mode. This is a nice feature to have in a helicopter blade. Some of the earlier metal blades were manufactured with a secondary spar bonded inside the main spar. This secondary spar would carry the load in the event of main spar failure.
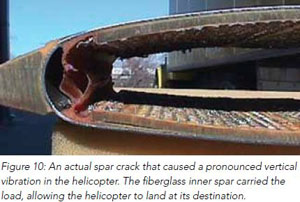
Secondary Spar
The next step would be giving the blade a good overall inspection, checking the metal parts for rust or corrosion and giving a coin tap inspection over the entire blade, listening for sound changes that could indicate internal delaminations. Coin tapping is a technique that combines both art and science. It should be done in a quiet area where you can easily hear very light tapping in a suspect area. Mark any suspect areas with a grease pencil and take measurements of these areas in case you need to talk to a blade shop. If you give them the location of the damage, they will be glad to provide help.
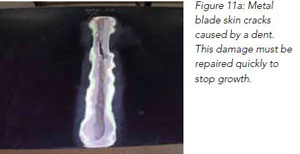
Skin Cracks
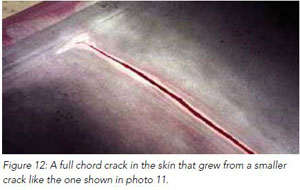
Skin cracks in metal blades usually start from a small nick or dent and then grow quickly in a chordwise direction. If they are discovered soon enough, a small skin patch is sufficient to stop the crack. In non-metal (fiberglass) blades, crack growth is usually much slower, and crack growth can be measured until allowable limits are reached and repairs are necessary.


Really Serious Cracks
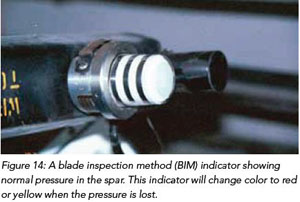
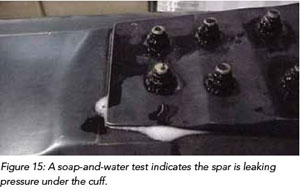
Some main rotor blades use a hollow spar which is charged with nitrogen to detect leaks and attempt to make the spar “fail-safe” by detecting cracks in the early stages. When the spar is pressurized to the proper setting, an indicator at the root of the blade shows a safe indication. Should a crack in the spar cause the pressure to leak, the indicator shows an unsafe condition that can be seen by the crew upon entering or exiting the aircraft. When the indicator shows unsafe, the blade is removed from the helicopter and sent to the shop for testing. A common test is the use of soap and water to detect bubbles, which show the location of the leak. Another test uses a halogen leak detector where the spar is charged with halogen gas and a small hand held “sniffer” is passed over the blade to detect the leaking halogen. This method is quite sensitive and finds the leak quickly. Some blade types introduce a vacuum into the spar instead of pressure, but the results are the same. There is a leak that causes the indicator to give a warning to the crew.


More Really Serious Cracks
Balance Problems
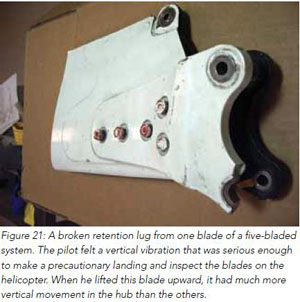
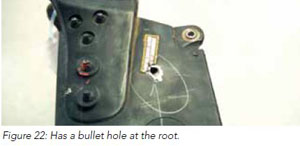
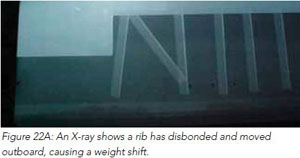
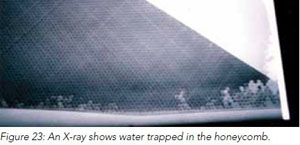
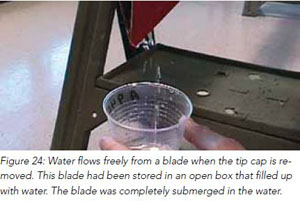
A helicopter is always a pleasure to fly and to ride in when it has a proper track and balance. This makes for happy pilots and passengers. When a rotor system that has been flying well suddenly develops a vibration that is not readily explainable, there is a good possibility that something has shifted inside one of the blades or it has taken on some water. The blade pictured above had a serious vertical vibration because of the loosened connection to the mast. Sometimes the vibration is caused by bullet holes (especially if the helicopter has been flying low over some suspicious green plants.) We sometimes find loose ribs that have disbonded and moved toward the tip inside a blade, and we occasionally find water that has migrated throughout the blade via centrifugal force.
Painting Blades
Occasionally, a balance problem can be introduced by the misapplication of paint to a helicopter blade. There are many operators painting their blades and doing an excellent job — however, there are some blade types that are sensitive to chord balance and will refuse to track properly if their chord balance has been disturbed. Let’s discuss where a blade’s center of gravity is located.
The chord center of gravity (CG) is located at 25 percent of chord or about one-quarter of the way aft of the leading edge. This does not get the most efficiency from the blade, but gives the blade the desirable stability where its performance will be predictable.
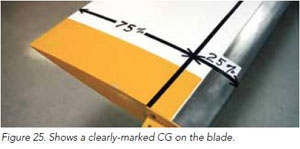
In Figure 25 above, the chord CG is clearly marked on the blade. A common, although mistaken, practice for field painting is to scuff up the existing paint and apply an even coat of paint all over the blade. This places most of the paint behind the chord CG line, making the blade trailing edge heavy and giving it a tendency to climb when installed on the helicopter. The preferred practice is to do a paint touch-up and only replace the paint that has been worn away. This restores the chord balance of the blade close to the original factory values.
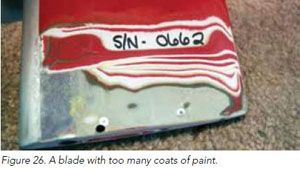
Another problem arises when a blade gets too many coats of paint, making it too heavy to balance by adjusting the internal weights. The blade shown in figure 26 had 13 coats of paint.
Expand Repairs
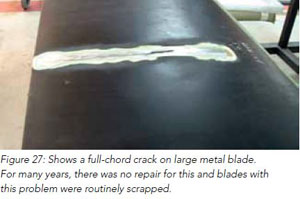
Most manufacturers publish repair limits for specific damage to a blade. It is impossible, however, to publish a repair procedure for every possible type of damage that might happen to a blade. If a blade has damage that exceeds the published repair limit, a new repair is engineered as an expanded repair and submitted to the FAA for approval. If the repair is approved, an FAA 8110 is issued as the authority to do the new repair. An example of an expanded repair that IAC has developed is a complete re-skinning of large metal blades when a full-chord crack is discovered in the skin. This type of damage always caused metal blades to be scrapped in the past. With this new repair, the blade can be returned to service and the user can realize the time remaining in the blade.
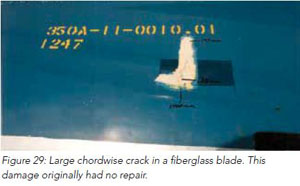
Another example involves a fiberglass blade that develops a crack approximately one meter from the root end as shown in Figure 29. Originally, the only option for the operator was to either exchange the blade or scrap it. Now there is a repair for this defect and it is guaranteed for the remaining life of the blade.

Repairs to New Blades Types
When a new blade design is introduced and damage occurs, there is an immediate requirement for new repair tooling. Normally, there is a separate repair tool specific to each repair of every blade type. This tooling takes time to design and build and is only used for the one specific repair. An alternative to this is the use of an autoclave, which although initially expensive, offers flexibility to do unlimited repairs without the need to manufacture new tooling for each repair.
Taking the Mystery out of Autoclaves
For many years, the established way to repair a rotor blade was to do a “lay-up” assembly of the replacement parts with film adhesives fitted between the parts to be bonded. The blade was then placed into a specially-designed tool that used a pressurized bladder in a frame that held it all together. As the film adhesive heated, it turned liquid and flowed evenly to the necessary areas. The pressure bladder squeezed the excess adhesive out the edges of the repair. The bladder was usually made of a silicone rubber material that had a maximum working pressure of about 20 psi. This low pressure limited the types of large repairs that could be done. This type of tooling could only be used for one specific repair.
The operation of a medical autoclave is simple. A rotor blade repair autoclave is a pressurized vessel that can be any size necessary to accommodate the full length of the blade being repaired. It can be heated to high temperatures for a precise cure of the adhesives. Some autoclaves are large enough to make aircraft wings. Pressures of up to 100 pounds or more can be used for very large repairs that require manufacturing pressures. This allows new shapes and profiles to be repaired without the need for stand-alone tooling and the time necessary to manufacture it.
Rotor Blade Repair Autoclave
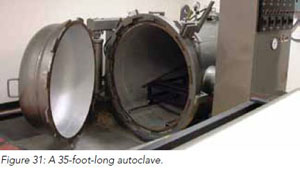
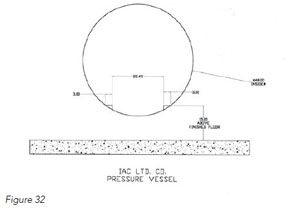
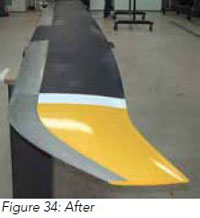
The autoclave pictured above is 35 feet long can repair five or more blades simultaneously. The use of an autoclave eliminates the need for specific separate stand-alone tooling for each blade type, and allows for quick repairs to new blade designs. Shown below are before-and-after pictures of tip cap damage to a new blade design. Building new tooling to repair this damage would have taken many months, but this repair was done in a few weeks.

Suspected Unapproved Parts (SUPs)
We all know that in order to be airworthy, aircraft parts must conform to the original type certificate or a supplemental type certificate. Occasionally, we receive blades that have been altered to disguise their original identity, and re-identify them by changing serial numbers, part numbers or total times since new. These changes are sometimes hard to find — unless you know what to look for.
An example of an identity change involves a set of two metal blades with acceptable records that matched the data tags on the blades. The total times were well below the finite lives of the blades, so everything looked OK initially. Many manufacturers also inscribe the part numbers and serial numbers on areas of the blade which are not easily accessible and then paint over these numbers. When we compared the serial and part numbers on the data tags with the hidden numbers on the spars, it was clear that these numbers had been altered to reflect totally different numbers. These blades were marked with part numbers that carried higher finite lives than the old part numbers. Sadly, the blades had exceeded their design life by a wide margin.
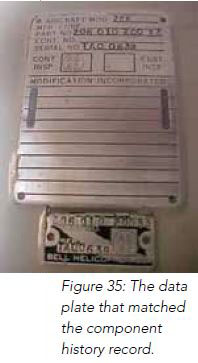
Most people are not aware of these hidden numbers, but most blade shops do check them to verify the blade is what it is represented to be. These numbers were not altered by mistake, rather they were altered to present the blades as something more valuable than they actually were. We have found instances of serial numbers from damaged and scrapped blades with good records appearing on other blades with run-out times but in good shape otherwise.
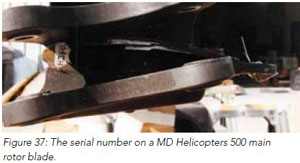
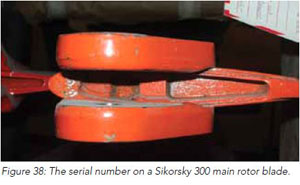
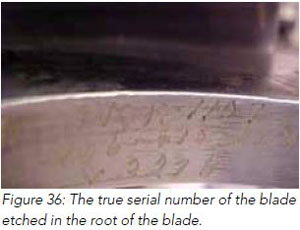
Other blade manufacturers also have identifying numbers stamped into the blade root.
We work in an industry that depends on total trust that the records are accurate, and it is sad that some individuals motivated more by profit than by safety have altered blades to increase their value. It is vital to have a trusted source when buying used blades.
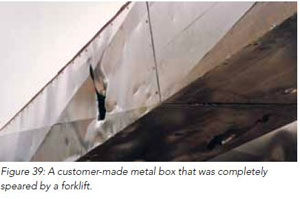
Freight Damage
When a blade is damaged, the most important thing to consider is to prevent any further damage during handling, storage or shipment. We have received many blades that were initially repairable inexpensively, but additional damage incurred during shipping required many additional thousands of dollars of repair work. Forklifts cause a significant amount of damage, but every day someone surprises us with new types of damage.

Shipping Secrets
The best advice we could give to someone about to ship a blade would be to:
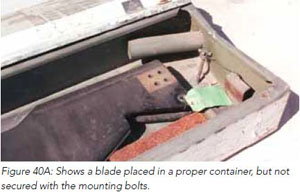
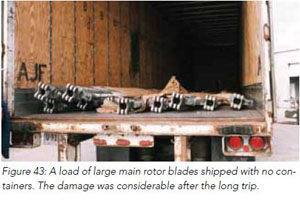
Use the proper container and don’t put in more blades than the container was designed to hold. We have received boxes containing many more blades than the box could hold safely and the blades received significant damage because of it.
Secure the blade inside the container with the proper holding devices. These include bolts through the retention pin hole, foam blocks, or “horse hair” material. Note: do not use tires as cushions.
Complete the log cards with the total time logged at their removal (T.T.S.N).
Seal the records in a Zip Lock bag and either tape them to the blade or place them in the compartment provided in the container. You would be surprised how many log cards we receive that are soaked from a rainstorm as the truck passed through.
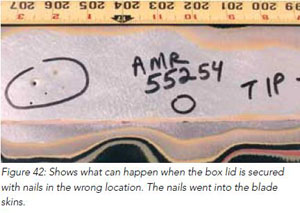
If the container top is missing some bolts or the wood is chewed up from past nailings and the nails will not hold, use steel bands to secure the lid.
Plan on doing two inspections. Do one before the container lid is installed to check basic security of the blade, and one after the lid is installed to check for proper banding and lid security.
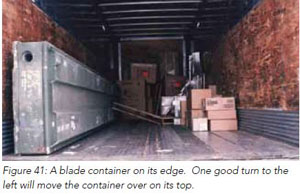
As a last effort, try to imagine what could happen to the blade during transit. You cannot prevent a determined forklift operator from running a fork through a box, nor can you keep a box from being dropped. You cannot prevent a container from being placed upside down or on its side. The only thing you can do is visualize all the things that might happen to your blade during transit and secure it as well as possible before it leaves your shop. Through the years, we have received blades that required minor repairs when they were shipped, but suddenly required significant repairs when they arrived at our dock.
There you have it. These tips will help make your blades last a little longer, keep your repair costs down, and help them reach their design life safely. With the three most expensive parts of the helicopter being the engine, transmission and rotor blades, it’s a good investment to learn how to give your blades the proper care and feeding. The money saved from giving good care to the blades might easily be your own!
Dana Kerrick started working aircraft maintenance in the U.S. Air Force in 1959, turning wrenches on B-52 Bombers. He holds an FAA repairman certificate on rotor blades and also holds ground instructor certificates for basic, advanced and instrument ratings. Dana has been a chief pilot instructing in airplanes and helicopters since 1970. He has been active in blade repair since 1981, and is presently vice president of International Aviation Composites Ltd. in Fort Worth, Texas. He has been teaching rotor blade preventive maintenance at FAA IA Refresher clinics for 10 years.